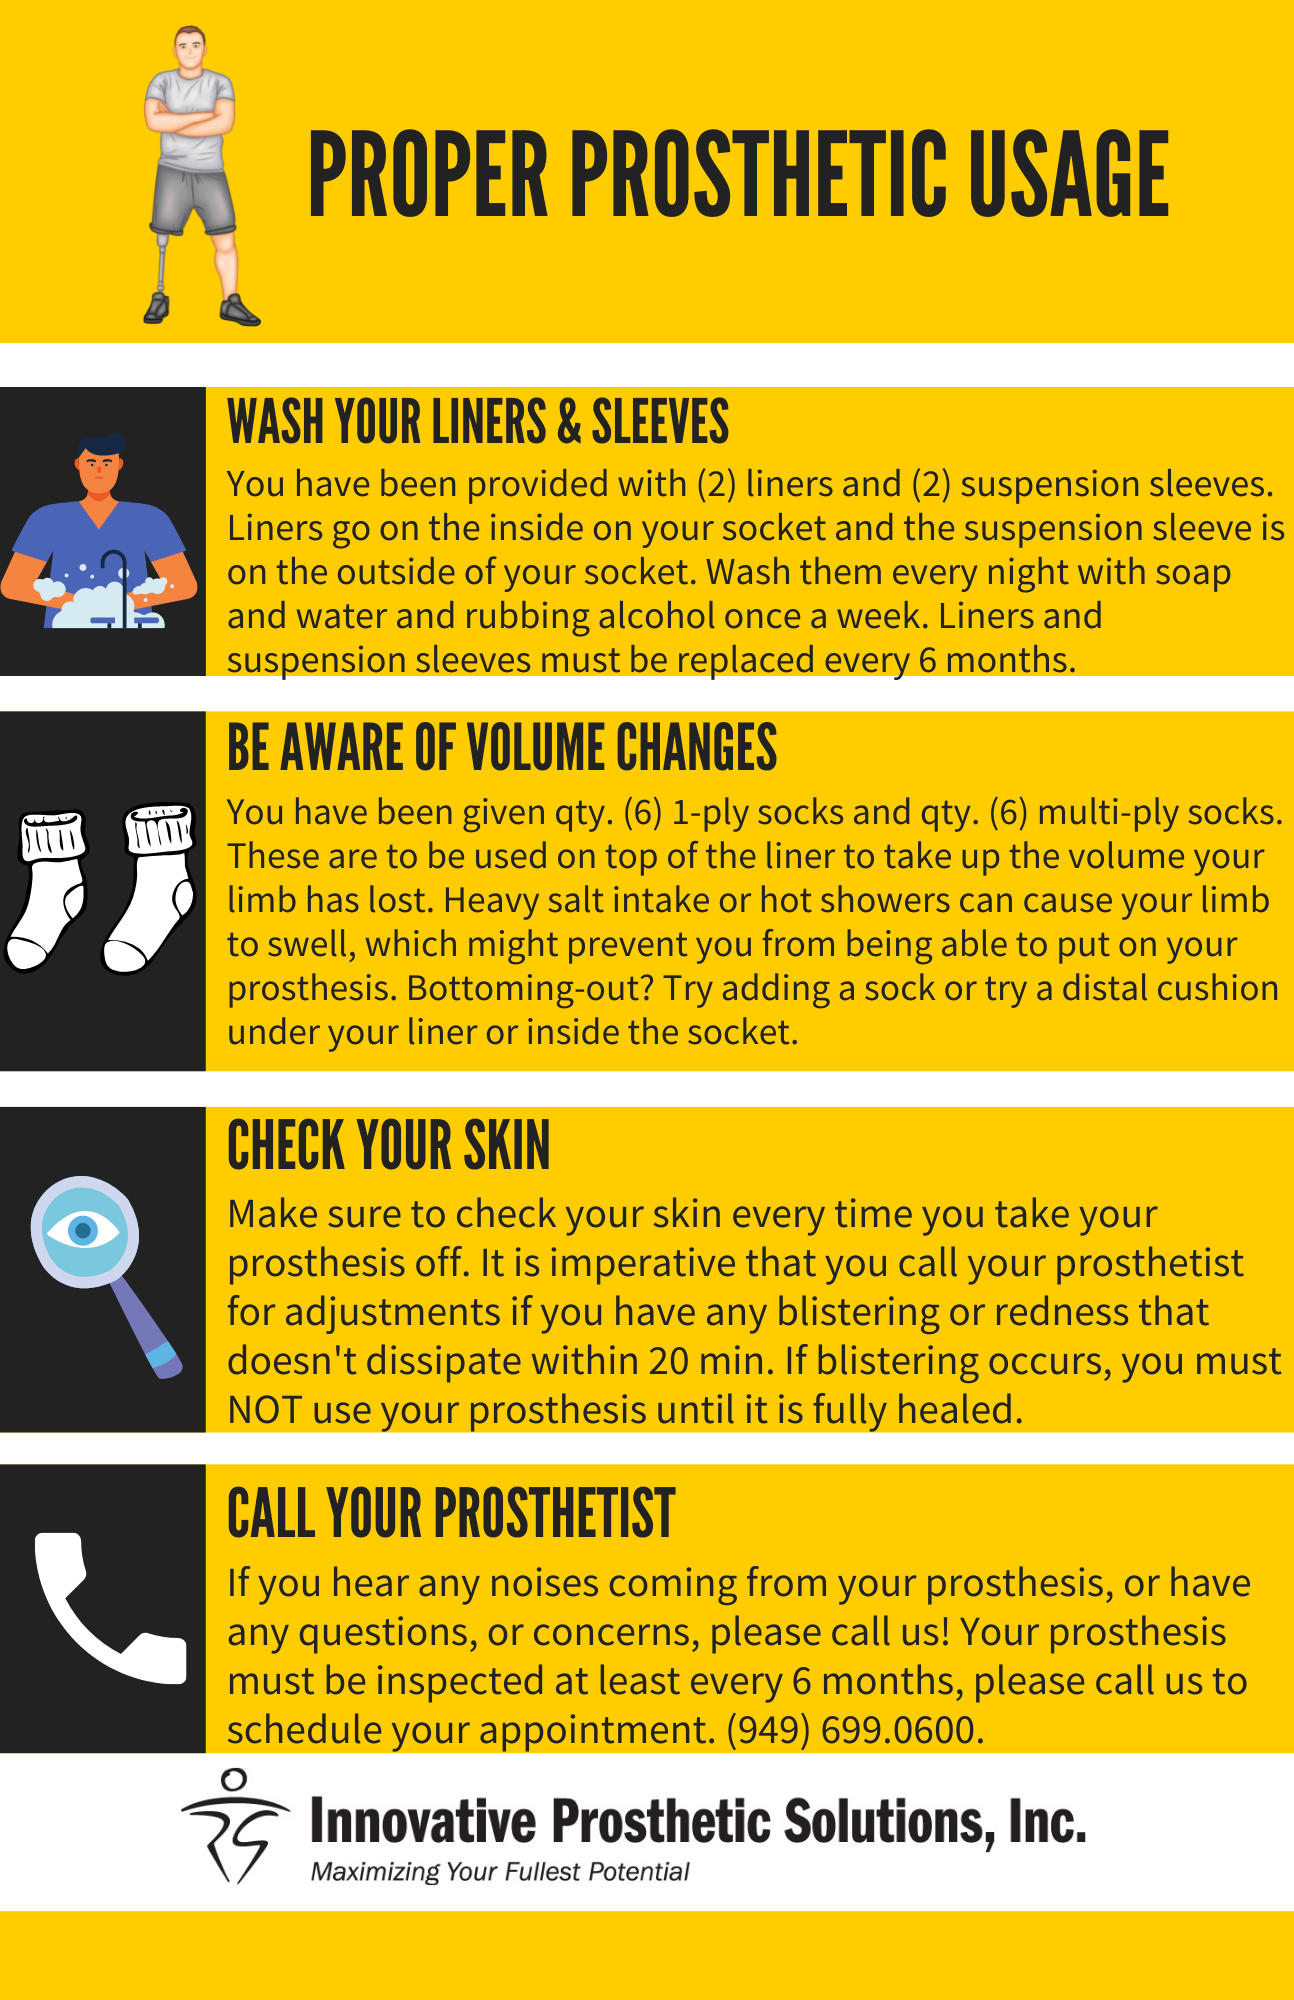
Common Skin Issues & Solutions: Amputee Edition

Disclaimer: Please spot check or check with your physician prior to using these products. These are only recommendations and possible solutions. Try at your own risk.

1.Dry, flaky skin

Possible Cause(s): Dry skin could be caused by the weather, an irritating product or fabric, or possibly your daily routine (especially if that routine includes very hot showers).

Possible Solution(s): To relieve itchy, dry skin, add a skin-nourishing moisturizer to your daily skin care routine. A thick, creamy formula will soften the skin, keeping it from cracking and drying out again. We suggest you check out VitalFitSR, their product is formulated with amputees in mind. In the mean time you could wear a “liner liner” which is a thin one ply cotton stocking over the area and under the liner to protect your skin.

Link provided below:
https://vitalfitsr.com/


2. Skin irritation on the thigh

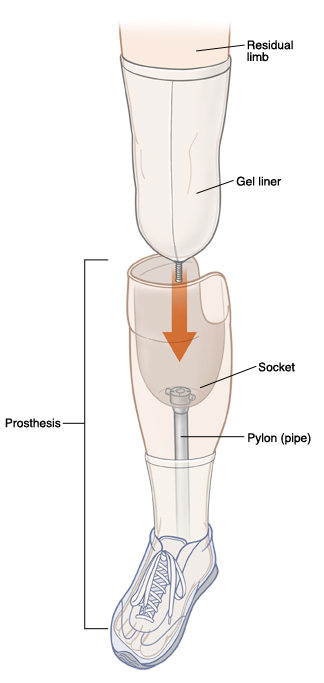
Possible Cause(s): The top edge of the gel liner and/or sleeve is pulling on the skin of your thigh. Your skin could also be sensitive to the material of the liner.

Possible Solution(s): Apply a thin layer of vaseline or anti-itch cream over the area of your thigh where the irritation is occuring. Roll your prosthetic liner and suspension sleeve on instead of pulling them on.

Link provided below:
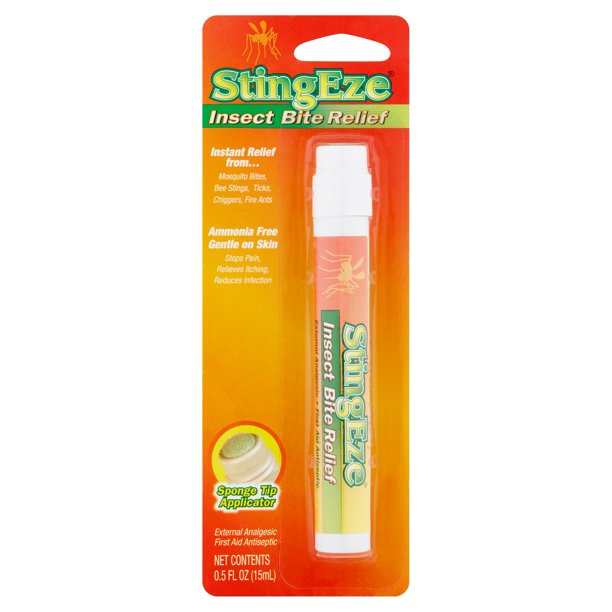
Amazon.com: StingEze Original Insect Bite Itch Relief Dauber, 0.5 Ounce, Black (3310) : Liberty Mountain Sports: Health & Household


3. Skin irritation on your knee cap

Possible Cause(s):  The  prosthetic liner and/or BK sleeve is pulled too taut over your knee. Or, if redness is occurring along the bottom third of your knee cap, it could be caused by volume loss in your limb. 


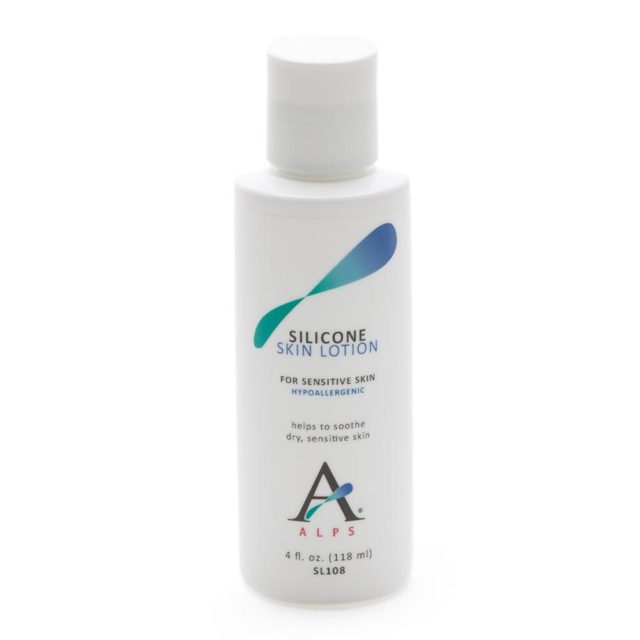
Possible Solution(s): Use an anti-chafing cream or hypoallergenic silicone lubricant oil along your knee cap to help your prosthetic liner or below-the-knee sleeve glide on easily.

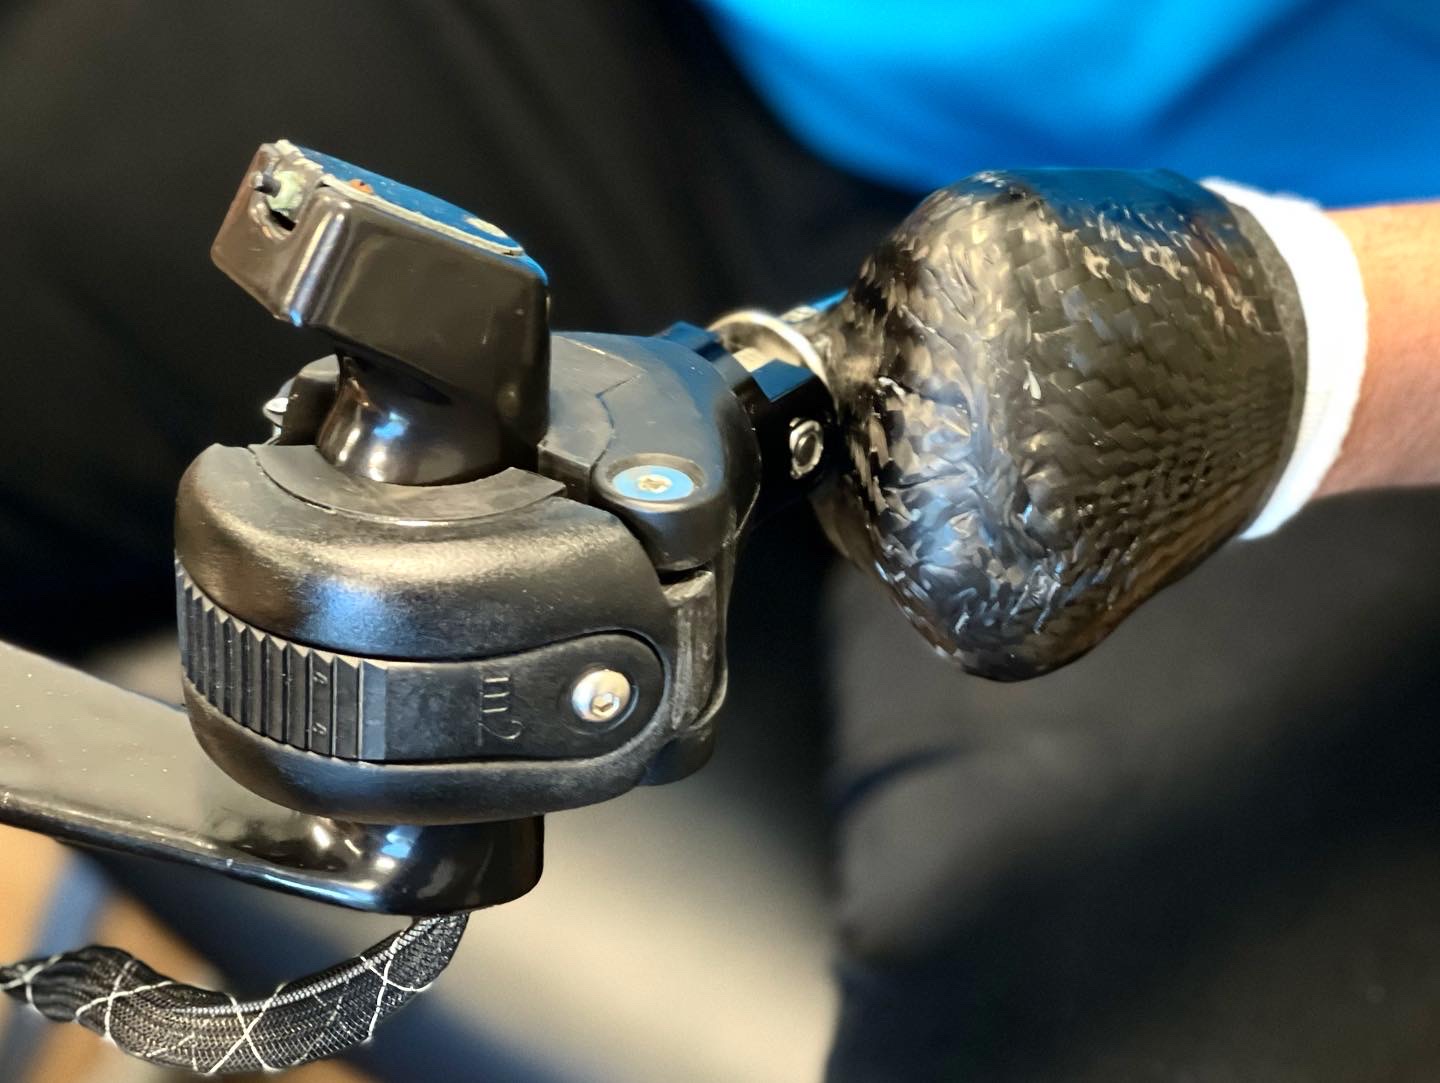
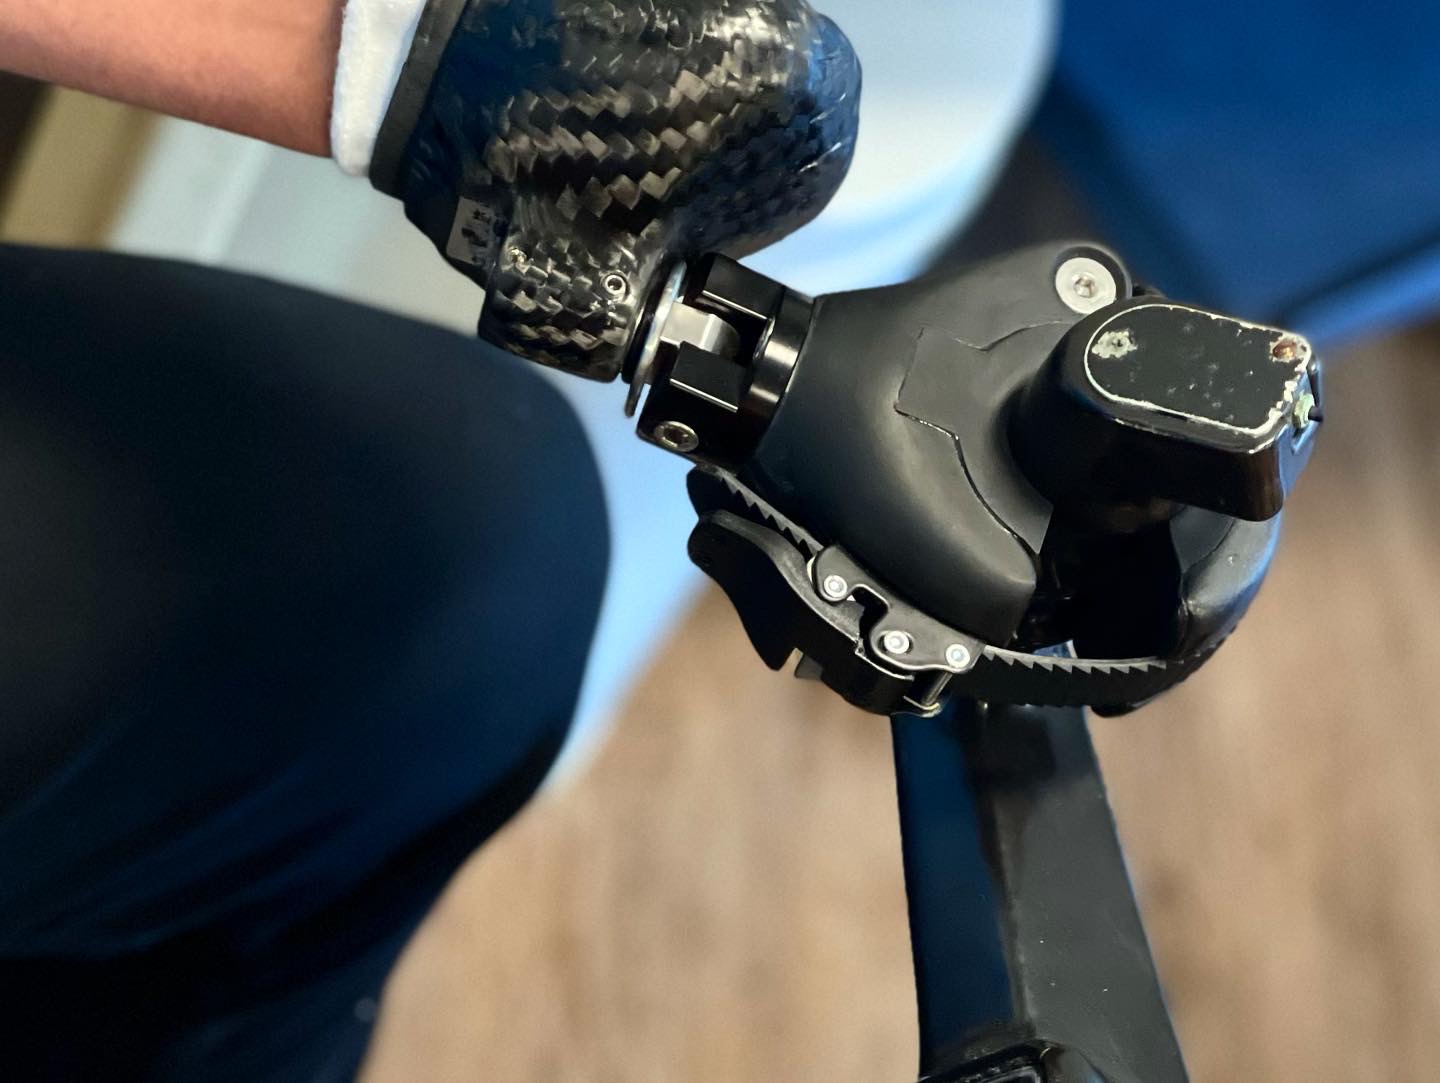
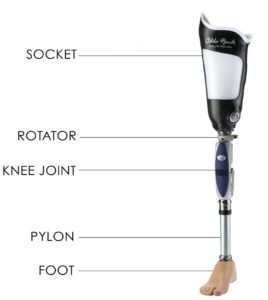
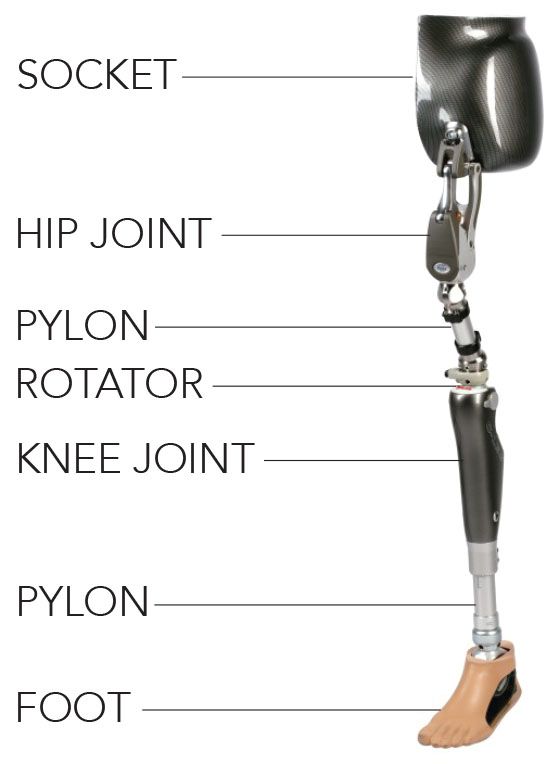
Excessive redness along the bottom third of your knee cap is typically the result of insufficient prosthetic socks.  To manage fluctuations in limb volume, start with a one ply or filler sock and continue adding ply until your prosthetic socket fit is comfortably snug and your knee cap is sitting in the proper location above the MTP bar. If the top of your prosthesis feels snug but the distal end is loose, you may want to consider using a half sock to accommodate volume loss along the bottom half of your prosthetic socket.


4. Excessive sweating

Possible Cause(s): Amputees have smaller overall skin surface area, which affects the body’s ability to cool itself, therefore you sweat more in response to physical exertion. Additionally, your limb is under layers of materials, like prosthetic liners, and prosthetic socks, which don’t let cool air reach the skin underneath.

Possible Solution(s): While you can’t totally eliminate perspiration, you can invest in a good antiperspirant and sweat control textiles, like a prosthetic sheath to wick away moisture. Socks with silver are said to be antimicrobial, that might help wick away moisture and prevent excessive bacteria buildup. If these remedies don’t work, you can consider medical options like Botox injections administered by your Physician. Always check in with your physician prior to doing any sort of medical treatment.


5. A skin rash that prickles (heat rash)

Possible Cause(s): Heat rash is caused by sweat trapped in your pores and disrupting the body’s regular cooling off activity. A rash tends to appear where skin rubs against skin, such as in skin groin and behind the knees.

Possible Solution(s): The best treatment is to dry off, cool off, and avoid friction on the skin by wearing loose, light weight clothing and using an anti-chafing prosthetic product. 


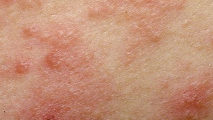
6. Contact Dermatitis (red skin, skin bumps, blisters, scales, crusts, or sores)

Possible Cause(s):  Contact Dermatitis is a skin rash often caused by an allergic reaction. It may also be brought on by contact with a substance (detergent, skin care product) or material that irritates the skin. Left untreated, dermatitis could lead to chronic inflammation, cellular damage, or cancer. 

Possible Solution(s): Cleanse first, then apply anti-itch lotion, barrier cream, and/or topical steroids to soothe the skin. Helpful products like hydrocortisone and zinc oxide can be bought over-the-counter (OTC).

If some component of your prosthesis or skin care routine is causing the allergic reaction, you should stop the material or the product as soon as possible. Figure out what’s causing the reaction through process of elimination. Once you know the source of the irritation and remove it, the problem will most likely go away.

The issue can also arise due to lack of hygiene, always remember to wash your liners everyday with a mild soap, you could use Dawn dishwashing soap. And wash your liners and suspension sleeves at least once a week with a water and rubbing alcohol mixture.


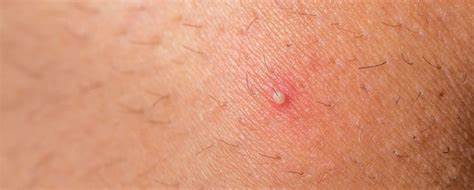
7. Small red bumps or white-headed pimples around hair follicles (folliculitis)  

Possible Cause(s): Shaving your residual limb or wearing a prosthesis that rubs the skin can irritate the hair follicles, which can lead to folliculitis. Hair follicles are also irritated by sweat buildup. Damaged hair follicles are more susceptible to bacteria, yeast, and other fungi, and so more likely to become infected. 

Possible Solution(s): Products called drawing salves, such as ichthammol, can help draw out infection and other objects, including ingrown hairs, from the skin. It’s also a good idea to let the hair on your limb grow, rather than shaving it. Using a mild cleanser with salicylic acid might help reduce the issue.


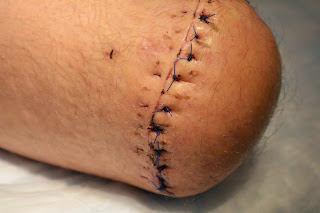
8. Pain, swelling, or leaking along the suture line

Possible Cause(s): Following an amputation, remnants of an absorbable suture that didn’t completely dissolve can cause pain, swelling, redness, oozing, separation of the wound, and fever. 

Possible Solution(s): A physician can have the remaining suture removed.


9. Cysts (small bumps or nodules)

Possible Cause(s): After you’ve worn your prosthetic limb for months or even years, you may notice small bumps or nodules that go away once you’ve removed the prosthesis. But don’t be fooled by this disappearing act — the underlying problem remains, and the constant rubbing caused by the prosthesis can make the problem worse. Cysts will become larger and more numerous if left untreated. Cysts are a common problem for above-knee amputees (often on the inside of the leg, along the edge of the prosthesis), although below-knee amputees may discover them as well. 

Possible Solutions(s): Cysts should always be treated by a doctor before they become infected and cause further damage. It’s very important for you to contact your Prosthetist to address your socket fit.


Not sure if any of these is your issue, or your problem persists after treating it at home? Consult your Certified Prosthetist to see whether the problem can be addressed with minor prosthetic adjustments, or whether it’s time to see a physician. 

Partial Hand Prosthesis

Jason’s dream was to return to flying his plane. He was born with a congenital limb difference, he gave up due to it being difficult flying with just his right hand. We helped make his dream come true and he is so ecstatic to be able to return to soaring in the blue sky!


El sueño de Jason era volver a volar su avión. Nació con una diferencia congénita en una extremidad, se rindió debido a que le costaba volar solo con la mano derecha. Ayudamos a hacer realidad su sueño y está tan extasiado de poder volver a elevarse en el cielo azul.

Things to Remember: Prosthetic Usage

We understand that a lot of the information provided at delivery can be overwhelming. We have provided you with a quick guide as a kind reminder of things to look out for, and what to do with your prosthesis. This has been tailored to our patients but we do hope it can help you too. If you need further assistance please reach out to our office.

What Makes Up A Prosthesis: Components Lower Extremity

Depending on amputation level, there are different parts to a prosthetic device including suspension type. Below, you will find common basic components that make up a prosthesis so that you can have a better understanding about what makes up a prosthesis. Designs and componentry selection can defer from prosthetist to prosthetist depending on patient presentation, activities and goals. This is determined via K-levels (take a look at our K level post for more information: https://www.ipsprosthetics.com/what-are-k-levels/ ). For further questions please contact our office we would love to help you. If your level of amputation defers from images shown below and you would like more information on what might work for your clinical presentation please call (949-699-0600).

Below Knee Prosthesis

Above Knee Prosthesis

Hemipelvectomy

What to expect: Post-Amputation Surgery.

What should you expect after an amputation?

After the amputation your residual limb will be bandaged with dressing and possibly an Immediate Post-operative Prosthesis (Check out our post about the IPOP https://www.ipsprosthetics.com/immediate-post-operative-prosthesis-ipop-instructions/). Your doctor’s main goal here is to quickly heal the surgical site and to prepare your residual limb for your future prosthesis.

The focus during the initial period after the operation is on three goals: You should have little to no pain, your residual limb should be able to bear weight, and you should be able to move your residual limb optimally in all directions. It is imperative to try and keep your knee or your hip joint as extended as possible to prevent joint contractures. A contracture is a condition of shortening and hardening of muscles, tendons, or other tissue, often leading to deformity and rigidity of joints.

In order for all of this to succeed, it is important for you to have your doctor, nurse, prosthetist or physical therapist show you a few important things right after the operation. This includes correct positioning in bed so that the muscles and the joint adjacent to the residual limb don’t retract or become stiff, as well as regular exercise. This will allow you to be fit more quickly and easily with a prosthesis so that you can remain mobile and active. Everyone is different, healing rates for everyone are different.

Wound healing of the residual limb

When you wake up from the anesthesia, your leg will have likely been treated with simple bandages or a plaster cast with a small drainage tube leading out of it. This tube was laid into the wound during the operation so that wound seepage and blood can flow out of the wound, and will be removed from the wound during the healing process. Sometimes an Immediate Post-Operative Prosthesis (IPOP) is added to protect the residual limb and to keep the knee as straight as possible to get ready for prosthetic care.

In most cases the amputation wound closes and forms a scar within the first three to four weeks. But even if the scar looks like it has healed well from the outside and only the color of the scar tissue is changing slightly, complete healing of the scar will take significantly longer.

During this period compression therapy and skin care creams are enormously important in helping the scar tissue remain soft and pliable—while simultaneously developing the ability to bear weight so that it’s possible to wear the prosthesis.

Compression therapy

With the aid of pressure applied to the residual limb over a large surface area, swelling (edema) of the residual limb can be reduced and the residual limb can be formed for the future prosthetic fitting. This compression of the residual limb contributes to being able to do your prosthetic fitting as soon as possible and to making it easier to adjust your prosthesis. In addition, compression aids circulation in the residual limb. This reduces the amount of pain and results in improved healing of the scar.

Various techniques are used for compression therapy: The residual limb may be wrapped with an elastic bandage, or compression socks or a prefabricated silicone liner may be worn. This will be determined by the medical staff.

Bandaging

Compression bandages are applied using a special wrapping technique after the wound bandage or residual limb cast is removed. During the first few days and weeks after the operation, your residual limb will be bandaged by your therapist or by the nursing staff. This somewhat elaborate compression involving elastic bandages can be customized to your individual residual limb amputation level.

The bandage will be removed frequently in order to make sure the residual limb was not wrapped too tightly or too loosely. The caregiver will also check to see how the residual limb is healing, whether the edema is getting better, and how the scar is healing. After sufficient healing, the compression bandage may only be worn for several hours at a time.

Later on, your caregivers can show you how to apply the compression bandage yourself. Make sure you have the wrapping process explained to you in detail in order to avoid mistakes which could lead to renewed swelling of the residual limb, or to irritation or injury made by folds in the bandage or wrapping that’s too tight. To avoid injurying your sensitive residual limb, use tape on the bandages instead of metal clips.

It is also important that you clean the bandages thoroughly. Since the bandages absorb sweat, they should be washed daily with a mild detergent or a mild soap. Remove the majority of the water by rolling them up gently in a towel, then lay them out flat to dry. Do not hang the bandages up to dry, as this can affect their elasticity.

You have to wear your compression bandages until your residual limb is fully healed. As soon as everything has healed, you can try sleeping through a night without wearing the bandage, but only after consultation with your doctor, prosthetist, or physical therapist. However, if you experience a lot of swelling in the residual limb the next morning, you should continue with the compression therapy.

Residual limb compression socks

Compression socks can also be used instead of bandages. The socks are also elastic and available in various sizes. Custom sizes can also be made if the standard sizes do not fit you. Like elastic bandages, the socks must be washed daily and laid out to dry so that they do not lose their elasticity.

The advantage of residual limb socks is that they are easy to put on and take off. You can use suspenders attached to a hip belt to hold the socks up. Or you can use a pelvic band which is fastened permanently to the sock. The compression sock is usually fit by your prosthetist. If you need one, please give us a call, we would love to help you.

Silicone liners

In addition to elastic bandages and residual limb socks, silicone liners offer a further method for achieving compression. Similar to residual limb socks, silicone liners are available in standard sizes as well as customized fabrications. The liner exerts even pressure on your residual limb and forms it properly. In addition, the flexible, skin-friendly silicone can help make the scar soft and pliable.

To put the liner on, it is best to first turn it inside out and then roll it evenly onto your residual limb. Don’t pull it up like a sock, and take special care to ensure that no folds or air pockets form. Make sure the distal end is completely rolled inside out and pressed against your distal end to ensure no air is in the liner.

Clean your liner daily with a skin-friendly, unscented soap and warm water. If you sweat a lot, you should clean it several times a day and possibly use a disinfectant. Have your prosthetist explain the care of your liner in detail and follow directions in your user’s manual. Typically you receive two liners, that is so you can use one and wash one. They should be interchanged every day.

Caring for the residual limb

Although the nursing staff and the doctors were initially cleaning the wound and changing the bandages, now that you are in the rehabilitation phase you will be caring for your residual limb and your sound leg yourself.

How to properly care for your residual limb

Your therapist or prosthetist will show you how to properly care for your residual limb. In order to prevent the skin from becoming rough and scaly, wash the residual limb with warm water and a mild soap every morning and evening. Then dry the skin thoroughly or carefully dab it dry and put cream on it. For suggestions of lotions to buy please give our office a call, we can give you a list of products to try that are specifically formulated with amputees in mind.

If folds of skin or retracted scars, also known as invaginations, have formed on the residual limb, they must receive particularly care in order to prevent infections. Have your rehabilitation team advise you in this regard. In addition, look out for injuries, pressure sores, and blisters while you care for your residual limb. These must receive medical treatment. A mirror can help you look at the back of your residual limb. Regular massaging and careful stretching of the scar is another important component of residual limb care.

Also note that putting the prosthesis on in the morning right after you wash is often more difficult than usual, since warm water causes the skin on the residual limb to swell. Food intake and weather can also affect the size of limb, which could make it difficult to don the prosthesis.

Caring for the sound leg

After the amputation, when the residual limb is not yet able to bear a lot of weight, it’s common to put more weight—and stress—on the sound leg. Work with your care team to find the best ways to keep you sound side healthy.

Traveling with a Prosthesis 101


Traveling with a prosthesis? Tips and Tricks to make sure your trip goes smooth sailing or flying!

Not knowing what to expect when traveling with a prosthetic device can be a frightening. Do not fear, here are some things to keep in mind when traveling.

Going on a trip can be exciting, especially when you are going to a new destination or visiting friends and family. However, it is also notorious for being a tedious affair, especially for those that wear a prosthesis. But the thought of preparing everything you need to ensure a hassle-free trip does not have to put a damper on your travel spirits. So, we’ve put together this handy travel guide for you to ensure smooth sailing.

Prior to scheduling your itinerary

Keep in mind your travel connections:
Some airports are larger than others, trams might need to be taken, stairs, and a lot of walking. Ensuring a proper layover and keeping in mind the airport you will be making a connection in will allow you to have a stress-free journey to your destination.

For example, bilateral above-knee amputees, expend a lot of energy just walking, and airports can be very exhausting. They are even exhausting for able-bodied individuals.  So, as you travel, you might want to keep a running list of the best and the worst airports in which to connect, and if you, unfortunately, have to stop at one of the bad ones, ensure you have enough of a layover to get where you need to go without having to rush.

Contact TSA Cares

Hopefully, you’re reading this at least a few days before your flight because it is recommended to get in touch with TSA Cares at least 72 hours in prior to departure. TSA Cares is the TSA’s dedicated helpline that assists travelers with medical conditions. If you are traveling with a prosthetic arm or leg, they will provide you with guidance on what you can expect during the TSA’s screening process. They will also be able to assist you with any questions or concerns you might have with a representative

If the representative deems it necessary, they will refer you to a passenger support specialist, who is trained to help individuals with specific needs. They can also assist you throughout the safety screening process to ensure that someone can take care of your needs.

If you want to request for a passenger support specialist, call TSA Cares at 855-2227 and 787-2227. They are open on Mondays through Fridays, from 8:00 AM until 11:00 PM Eastern Standard Time (EST). Meanwhile, on weekends and holidays, you can speak to a representative or a specialist from 9:00 AM until 8:00 PM.

Be sure to notify the TSA officer that you have a prosthetic device before screening begins. You have the option to remove your prosthetic and have the device x-ray screened. If you’d prefer to not mention your prosthetic verbally, the TSA provides a notification card which you can print out on the TSA’s website and hand it to the agent. Should you wish for a private screening, remember that you can request for it.

You can find that notification card here:

https://www.tsa.gov/sites/default/files/disability_notification_card_508.pdf

If you opt for a private screening, remember that you can ask to be accompanied by an assistant, friend, or family member who can assist you, but only after they have been successfully screened themselves. If you are not comfortable with a private screening, you have the right to refuse it, but you will still need to complete a security screening to proceed beyond the security checkpoint.

Regardless of the chosen screening method, your prosthesis will always need to undergo additional screening. The TSA officer may ask to see and touch your prosthesis but will not request or require you to remove it.

Pro tip:
Expect that you might set off security monitors, and wear comfortable, loose clothing and slip-on shoes so it’s easy to show your devices when requested. Also, get to the airport with plenty of time to spare, it’s better to get to your gate with extra time than to miss your flight due to security delays.

Prior to date of departure
First and foremost, it is important to check your prosthesis thoroughly to make sure it is in good shape. If you will be out of town for a couple of days or a few weeks it is imperative to make sure there are no cracks, leaks, etc. This is so that you have enough time to schedule an appointment with your prosthetist to make adjustments and repairs before you leave on business, vacation, or any scheduled trip.

Miscellaneous, yet important, things to keep in mind when travelling

Be mindful of hygiene. Travel exposes you to more people and places than your everyday life. Make sure you bring whatever you need in order to keep your prosthesis and your skin clean and disinfected.

If you think you might need it (ask your prosthetist), bring spare parts with you, especially because medical devices travel for free. If an airline ever wants to charge extra for a bag that contains prosthetic parts or supplies, just let them know that the bag contains medical devices; the bag should go free of charge. Do note that this only applies to bags that contain only medical devices, but some airlines are stricter than others on this rule.

Extra Things You Might Want to Pack:

– Extra prosthetic socks

– Extra socket liner

– Duct and filament tape to repair strap or buckle breaks

– Antibacterial cream for abrasions from overuse

– Spare suction valve

– Plastic bags to protect your prosthesis if you wear it around water or sand

– Phone numbers of certified prosthetists and prosthetic facilities in the area in which you are vacationing (just in case).

Here is a link to a handy prosthetic bag:

https://amputeestore.com/products/amputee-essentials-prosthetic-leg-bag

While traveling with a prosthesis may seem like a recipe for airport security disaster, it is not always the case. If you have done your research and you took the necessary steps to prepare for it, the odds are most likely in your favor.

If you have any tricks you would like for us to add to this post, please let us know in the comments! Any other questions? Please contact our office 949-699-0600.

What are K-Levels?


K-levels are a rating system used by Medicare to indicate an amputee’s rehabilitation potential. The system is a rating from 0 through 4 and it indicates a person’s potential to use a prosthetic device. K-level designation is important because it is one of the determining factors in the decision of componentry that can be chosen by the prosthetist for the prosthetic device.

There are a total of 5 levels (K-levels 0-4), and Medicare defines them as follows:

K-0
The patient does not have the ability or potential to ambulate or transfer safely with or without assistance and a prosthesis does not enhance their quality of life or mobility.
K-1
The patient has the ability or potential to use a prosthesis for transfers or ambulation on level surfaces at fixed cadence or speed. This is typical of a household ambulator or a person who only walks in their own home.
K-2
The patient has the ability or potential for ambulation with the ability to traverse low-level environmental barriers such as curbs, stairs or uneven surfaces. This is typical of the limited community ambulator.
K-3
The patient has the ability or potential for ambulation with variable cadence or multiple speeds. A person at level 3 is typically a community ambulator who also has the ability to traverse most environmental barriers and may have vocational, therapeutic or exercise activity that demands prosthetic use beyond simple locomotion.
K-4
The patient has the ability or potential for prosthetic ambulation that exceeds basic ambulation skills, exhibiting high impact, stress or energy levels. This is typical of the prosthetic demands of the child, active adult or athlete.

How are K-levels determined?

K-levels are determined by the clinician (prosthetist, therapist or physician), using one of the following commonly used outcome measures.
Amputee Mobility Predictor (AMP)
Patient Assessment Validation Evaluation Test (PAVET)
Prosthesis Evaluation Questionnaire (PEQ)
Timed Up and Go (TUG)
Timed Walk Tests
Distance Walk Tests

Interested in knowing your K-level or your loved one’s potential K-level? We’re here to help you reach your fullest potential. Please contact our office for an evaluation or if you have any questions!


BK prosthesis – Testimonies

“I lost my leg in a motorcycle accident in 1998. Living in Paris, France I was never fit with a prosthesis that I could tolerate wearing. I was referred to Tyra by a surgeon and flew out to California to meet with him. I was immediately impressed by his professionalism and engaging manner. Once I made the decision to work with Tyra I really came to appreciate both his understanding of amputees as well as his knowledge of the products and then those which would best suit my needs. As with all things in life this is a process and we learn by doing. Tyra learns and teaches well with his clients and that keeps me coming back as well as his on going efforts to not only get it right but to always improve. Tyra immediately helped me to start putting my life back together when he fit me with my first comfortable and properly fitting prosthesis. Had it not been for Tyra I could not be doing today what I used to do and that is walking, dancing, and hiking.

Thank you Tyra and the entire staff.

Ted R.


“BKA here. I switched Prosthetist because I was not feeling the love. About 6 months ago, someone recommended Tyra and boy am I glad I found Tyra. As I met with him for the first time, he went over a lot of options and suggestions on what could work best for me. He will spend all the time it takes to explain things to you and will answer all your questions thoroughly. Working with Tyra made me realized the world of difference it makes when dealing with a person that has a lot of experience in this field. Every issue I was having with my device he knew exactly what to do to make it feel better.

It’s a small office of about 3 staff members, and when you get there for the first time you feel as if you’ve been going there for a long time. Right away you feel the love. The staff is always super friendly helpful and accommodating.

I highly recommend anyone with a prosthetic to schedule a consultation with Tyra. I am confident that he will fit his expertise on your specific need.

Thank you for your continued help and support Tyra, Jessica and Tanja!”

Jules L.


“If you are in need of a prosthetist or orthotist, Tyra is marvelous.
he is caring, compassionate, encouraging, generous, and skilled.”

Linda B.


I am very proud to submit this recommendation for the team at Innovative Prosthetic Solutions. I have been their client for over a year now. They are fantastic. Very well qualified. Were recommended to me by my hospital. And were very welcoming from the very beginning. They have been very responsive to my needs and have taken the time to work with me and listen to me. I can easily say that I would not be walking now were it not for them. Plus, Tyra, Jessica, and Tania are just great people. Feel like I am visiting a friend when I go there.

If you are looking for a Prosthetist or an Orthotist be sure to check them out as part of your decision process: www.IPSprosthetics.com. You will be very glad you did. Highly Recommend them!

John, K. 2021


From the moment I met Jessica, while in the hospital after a lower limb amputation, I felt as though I was in good hands.  During my first office visit at IPS I was very nervous and didn’t know what to expect.  Tonya was so welcoming and Jessica and Tyra were very patient, Compassionate and caring!!  They explained the process  necessary to fit me for a prothesis and made me feel at ease.  I can’t thank them enough for everything they’ve done!   Two prothesis later I feel like I can now begin walking again!   THANK YOU Tyra, Jessica and Tonya for giving me another chance at walking!  You guys are the best!!

Phillip, M., 2021

BK (Below Knee Prosthesis)

Every prosthetic device is custom designed and tailored to each individual. We take pride in using light-weight cutting-edge materials and our own innovative designs in order to provide an optimal fit to every individual patient. 

Below Knee carbon prosthesis with Revo window system and inner liner
Below Knee carbon prosthesis with Revo system and black inner liner.
J.W. with running prosthesis, everyday prosthesis & water leg.
D.T. using Martin Bionics socket-less socket.
Posterior view of BK Socket-less socket
J.C. excited about his new prosthesis.
Below Knee carbon pin system prosthesis